I²C (Inter-IC-Communication)
The I²C bus is a bidirectional, serial two-wire bus, which allows many different peripheral components to connect to a single microprocessor. I²C is the abbreviation of Inter IC Communication and is invented and patented by Philips in the early 1980s. Nowadays, there are more than 50 licensees and over 1000 I²C compatible components at the market. This tutorial will show, how to program the communication via the I²C bus. For example application, a usual I²C compatible temperature sensor of type LM75 will be used to acquire temperature values.
Requirements: To complete this tutorial requires the JControl/IDE, a JControl-based device with I²C interface, and a temperature sensor with I²C bus interface of type LM75 http://www.national.com/pf/LM/LM75.html (manufacturer: National Semiconductor).
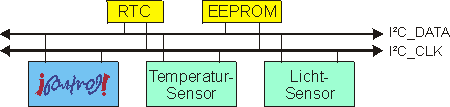
The I²C bus has become a standard for simple communication between integrated circuits. It is supported by most JControl compatible products by means of a respective interface (ports I2C_SDA and I2C_SCL). This way, external circuits are easily connected to a JControl device directly via I²C. Figure 1 shows a general schematic of how components are connected by an I²C bus.
I²C is a bus system. This means, that several components are connected to the same wires and are distinguished from one another only by different addresses. JControl devices hereby act as a "control center" (bus master) while the other devices are common components (so called bus slaves). On many peripheral components, the individual address of a bus slave (slave address) has been predefined by factory settings. But it may in most cases be varied by means of special address pins, which are respectively conntected and therefore allow multiple I²C components of the same kind to be connected to one bus master.
If you want to know more about the functionality and the extensive range of possible applications of the I²C bus, please refer to the respective sites of Philips Semiconductors http://www.semiconductors.philips.com/markets/mms/protocols/i2c/.
There is a descendant of the I²C bus called SMBus. This has been specified in 1995 by some organisations surrounding the manufacturer semiconductors Intel. The main application area for SMBus capable components is to be found within pc hardware (motherboards, notebooks, graphics cards, etc.); where the SMBus isn't just used to obtain temperature values, but also fan revolutions and operating voltages. In future PCI specifications, the SMBus will even be included as a "sub bus". The differences between I²C and SMBus mainly apply to the wires' voltages as well as some timing parameters. JControl devices are designed to connect to both I²C and SMBus components. Further information on the SMBus are to be found at the homepage of the SMBus consortium http://www.smbus.org.
I²C components
In the beginning, mainly small memory components (EEPROMs) with I²C interface were used. Nowadays I²C components are found in almost every modern circuit and fulfill manifold tasks, beginning with simple analog-to-digital converters, I/O port extensions, real time clocks, step motor controllers, rev meters for fans up to ultrasonic sensors for measuring distances.
Temperature sensors with I²C interface are available from many manufacturers. Table 1 lists some comparable types along with their parameters (adjustable slave addresses, resolution in °C). Like mentioned earlier, the stated slave is used to clearly identify a specific component. The addresses of the listed temperature sensors may be varied special pins, which are specifically intended for this purpose.
| Identifier | Manufacturer | Slave Address(es) | Resolution (in Bits) | 1 LSB Unit (in °C) |
|---|---|---|---|---|
| AD7416 | Analog Devices | 0x90, 0x92, 0x94, 0x96, 0x98, 0x9A, 0x9C, 0x9E | 10 | 1/4 |
| LM75 | National Semiconductor | 0x90, 0x92, 0x94, 0x96, 0x98, 0x9A, 0x9C, 0x9E | 9 | 1/2 |
| LM80 | National Semiconductor | 0x50, 0x52, 0x54, 0x56, 0x58, 0x5A, 0x5C, 0x5E | 9, 12 | 1/2, 1/16 |
| MAX6633 | Maxim | 0x80, 0x82, 0x84, 0x86, 0x88, 0x8A, 0x8C, 0x8E, 0x90, 0x92, 0x94, 0x96, 0x98, 0x9A, 0x9C, 0x9E | 12 | 1/16 |
| TMP75 | Texas Instruments | 0x90, 0x92, 0x94, 0x96, 0x98, 0x9A, 0x9C, 0x9E | 9, 10, 11, 12 | 1/2, 1/4, 1/8, 1/16 |
Note: Please regard though the temperature sensors listed above are very similar, they don't need to be compatible. This means that the program examples may have to be modified according to the used sensor. The differences not only apply to the slave addresses, but also the way of converting the acquired value into the real temperature value. Further information concerning this matter can be found in the according datasheet (just click the components' identifier above).
The experimental set-up
To demonstrate the fnctionality of the I²C bus, a digital temperature sensor of type LM75 will be connected to a JControl/SmartDisplay. To do this, merely the I²C signals SDA and SCL have to be connected, as well as VCC and GND for supplying the temperature sensor with power. The exact pin assignment of the JControl/SmartDisplay may be seen in the according data sheet http://www.domologic.com/download/pdf/jcontrol_smartdisplay.pdf.
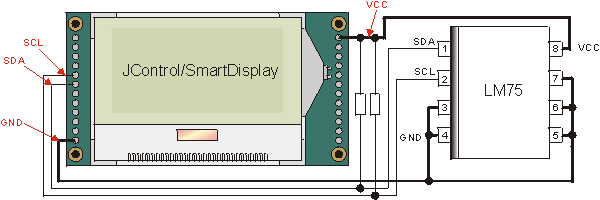
Hint: The circuit of the pins 5, 6 and 7 of the LM75 influence its I²C bus slave address. Further information in this matter can be found in the LM75 data sheet http://www.national.com/pf/LM/LM75.html. In the discussed example those pins are tied to GND, which results in the slave address 0x90. Furthermore, a back-up capacitor (commonly 100nF) close to the I²C component is recommended in case of a long distance between the power supply and this component.
Attention: When external periphery is connected to the I²C bus, the signals SDA and SCL have to be tied to VCC via a pull-up resistor (commonly 27k Ohm). Thus it is ensured that a defined voltage level is present on the signal wires, even if no bus component is driving/accessing them (see figure 2).
The evaluation boards (e.g. of the JControl/SmartDisplay) already provide those pull-up resistors, so that the periphery (here the LM75) may be directly connected to the lead through I²C signals. Further information are found in the evaluation boards' datasheets http://www.domologic.com/support/ch1/index_en.html.
The class I2C
For accessing the I²C bus, JControl devices provide the class jcontrol.comm.I2C, which implements the methods read and write to acquire or send single characters or complete byte arrays via the I²C bus. When instantiating this class, the slave address of the connected I²C component is passed as a constructor parameter. A detailed description of the I2C methods may be seen in the API documentation http://www.jcontrol.org/current/docs/api/jcontrol/comm/I2C.html.
The following Table conveys a short overview of the methods of the class jcontrol.comm.I2C.
| Method | Description |
|---|---|
I2C(int address) | Used to create an instance of the class I2C. This is related to the connected hardware by the given slave address. |
read(byte[] data, int index, int length) | Reads (status) data from the I²C periphery and writes it into the passed byte array data. The array will be filled with the specified amount of bytes (length), beginning at array position index. |
write(byte[] data) | Sends data or commands to the I²C periphery. |
To keep the example as simple as possible, the class LM75 will be implemented during the next section. This extends the class I²C and takes care of the the communication with the periphery.
The self-made class LM75
The next step for a comfortable access to the temperature sensor of type LM75 is to implement an own class called LM75. This ought to provide all functions of the real component in form of Java methods. Specificly this means that the measured temperature may be acquired via a method called getTemp(). This way the class LM75 smartly adopts the functionality of a specialised "device driver" for the LM75.
The following source code shows the implementation of the class LM75. It consists of two parts: The constructor, which creates an instance of this class and the method getTemp(), which returns the read temperature value.
| 1 | import java.io.IOException; |
| 2 | import jcontrol.comm.I2C; |
| 3 | |
| 4 | /** |
| 5 | * <p>LM75 is a class to access the I2C-compatible |
| 6 | * temperature sensor LM75 from National Semiconductor.</p> |
| 7 | * |
| 8 | * <p>(C) DOMOLOGIC Home Automation GmbH 2003-2005</p> |
| 9 | */ |
| 10 | public class LM75 extends I2C{ |
| 11 | |
| 12 | /** |
| 13 | * Constructor of this class. |
| 14 | * |
| 15 | * @param address slave address of the device |
| 16 | */ |
| 17 | public LM75(int address){ |
| 18 | super(address); |
| 19 | } |
| 20 | |
| 21 | /** |
| 22 | * Returns an Integer value representing the |
| 23 | * current die temperatur of the LM75. |
| 24 | * |
| 25 | * @returns An integer representing the current |
| 26 | * temperature in "Centigrades" (10*degree Celsius). |
| 27 | */ |
| 28 | public int getTemp() throws IOException { |
| 29 | // allocate buffer for temperature |
| 30 | byte[] buf = new byte[2]; |
| 31 | // read content of 16-bit register #0x00 |
| 32 | read(new byte[] {0x00}, buf, 0, 2); |
| 33 | // return integer value |
| 34 | return (buf[0]*10) + (((buf[1] & 0x80) >> 7)*5); |
| 35 | } |
| 36 | } |
In listing 1 can be seen that the method getTemp() is encapsulating the I²C communication with the temperature sensor. Thus the programmer, who hencforth ought to use the class LM75, only has to know the sensors' slave address in order to read out the current temperature value via method getTemp().
Line 32 shows the actual function call, that reads the temperature value form the sensor. It can also be seen, that the command byte 0x00 (for details: see below) is sent to tell the LM75 to sent its temperature value. This is thereupon written into the byte array buf (shortform of "buffer").
The temperature value consists of a total of 9 bits and therefore has to be written into two bytes. The first byte contains the integer part of the temperature (in °C). The most significant bit (MSB = bit 7) acts as a signum bit: A logical "1" represents a negative temperature value. This is just for information and doesn't matter for the conversion formula which returns the temperature value, because JControl uses the same data format. The remaining decimals are contained within the second byte. In case of the LM75, only the MSB of this byte is used and resolves to 0,5°C. So if the second byte equals 0x00, the remainder results in 0,0°C and if its value equals 0x80, the remainder results in 0,5°C. The formula, which converts the two bytes into the temperature value is:
| return (buf[0]*10) + (((buf[1] & 0x80) >> 7)*5); |
As can be seen, the integer part is multiplied by 10 and the decimal by 5 (actually by 10/2). This is done, because the small JControl versions do not support floating-point numbers. The method getTemp() thus returns the measured temperature value in 10*°C: In case of an actual temperature of 20,5°C, the value 205 will be returned.
If the pins of the LM75 are connected as shown in section "The experimental set-up", its slave address is set to 144 (= 0x90 in hexadecimal). This address will therefore be used in the next section A small testprogram to control the temperature sensor.
Details of the comand byte: The comand byte tells the sensor, which internal register has to be accessed. The temperature value of the LM75 is located in register 0, therefore the comand byte has to be 0 (= 0x00 in hexadecimal) in order to access this value. All stated information regarding the LM75, as well as further details may be seen in its data sheet http://www.national.com/pf/LM/LM75.html.
A small test program
The usage of the class LM75 will be demonstrated by a small testprogram, which reads the temperature value via this class and displays it on the LCD. The program is very simple and may roughly be described in three parts:
-
The constructor (line 29) creates an instance of the class
LM75, which thereupon is stored in the local variablelm75. The used slave address is set to thedeviceAddressstated in line 15. The address (0x90in hexadecimal) corresponds to the shown circuitry of the LM75.
-
The determination of the measured value takes place in line 35. The value returned by the method
lm75.getTemp()is temporarily stored in the integer-type variabletemp. The readout occurs inside of a so-calledtry-catch-block to catch and displays errors if necessary (lines 34-38).
-
The formatted output happens in lines 39-46. The measured value stored in
tempis displayed via a console (classjcontrol.comm.DisplayConsole) on the LCD.
| 1 | import java.io.IOException; |
| 2 | import jcontrol.comm.DisplayConsole; |
| 3 | import jcontrol.lang.ThreadExt; |
| 4 | |
| 5 | /** |
| 6 | * <p>LM75Test shows how to read the LM75 temperature |
| 7 | * detector class of the jcontrol.bus.i2c library.</p> |
| 8 | * |
| 9 | * <p>(C) DOMOLOGIC Home Automation GmbH 2003-2005</p> |
| 10 | */ |
| 11 | public class LM75Test { |
| 12 | |
| 13 | /** DisplayConsole */ |
| 14 | DisplayConsole console; |
| 15 | int deviceAddress = 0x90; |
| 16 | |
| 17 | /** |
| 18 | * Application Constructor. |
| 19 | */ |
| 20 | public LM75Test() { |
| 21 | |
| 22 | // init DisplayConsole |
| 23 | console = new DisplayConsole(); |
| 24 | |
| 25 | // display startup message |
| 26 | console.println("LM75 Test Program."); |
| 27 | console.println(); |
| 28 | |
| 29 | LM75 lm75 = new LM75(deviceAddress); |
| 30 | |
| 31 | for (;;) { |
| 32 | int temp = 0; |
| 33 | for (;;) { |
| 34 | try{ |
| 35 | temp = lm75.getTemp();//get temperature value |
| 36 | }catch(IOException e){ |
| 37 | console.println("Error: Sensor not responding!"); |
| 38 | } |
| 39 | console.print("Read: ".concat(String.valueOf(temp))); |
| 40 | //temperature resolution is 1/10 centigrade |
| 41 | int whole = temp/10; |
| 42 | int parts = temp%10; |
| 43 | console.println(" = ".concat(Integer.toString(whole)) |
| 44 | .concat(".") |
| 45 | .concat(Integer.toString(parts)) |
| 46 | .concat("\u00b0C")); |
| 47 | try{ |
| 48 | ThreadExt.sleep(500);//do nothing for 500 msecs |
| 49 | }catch(InterruptedException e) {} |
| 50 | } |
| 51 | } |
| 52 | } |
| 53 | |
| 54 | |
| 55 | /** |
| 56 | * Main method. Program execution starts here. |
| 57 | */ |
| 58 | public static void main(String[] args) { |
| 59 | new LM75Test();// start measuring |
| 60 | } |
| 61 | } |
Note: The character string "\u00b0C" in line 46 represents "°C". The sequence "\u00b0" is the UTF-8 notation of the degree character. This is used, because some editors modify the (special) character "°" while saving the according file, so that the character will not be displayed properly on a JControl device.
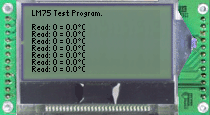
Figure 3 shows the above program while running in the simulator of the JControl/IDE. The temperature value is fixed to 0°, because the connection to the external temperature sensor LM75 can not be simulated. But if everything is working properly, the real measured temperature value would be displayed here.