Der folgende Quelltext zeigt ein Beispielprogramm, dass alle drei Button-Typen verwendet, um eine ansonsten zweckfreie Benutzeroberfläche zu erstellen.
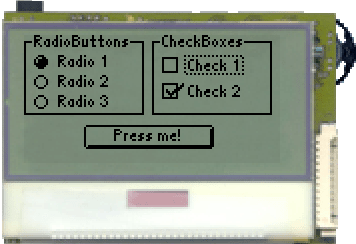
In Bild 1 ist ein Screenshot des VoleButtonExample-Programms auf dem JControl/Sticker dargestellt. Um das Look&Feel von JControl/Vole selbst auszuprobieren, laden Sie die Projekt-Datei VoleButtonExample.jcp aus dem ZIP-Archiv VoleButtonExample.zip in Ihre JControl/IDE und starten Sie den Simulator (alternativ können Sie das Projekt natürlich auch in Ihr JControl-Gerät laden!).
| 1 | import jcontrol.ui.vole.Border; |
| 2 | import jcontrol.ui.vole.Button; |
| 3 | import jcontrol.ui.vole.CheckBox; |
| 4 | import jcontrol.ui.vole.Container; |
| 5 | import jcontrol.ui.vole.Frame; |
| 6 | import jcontrol.ui.vole.RadioButton; |
| 7 | |
| 8 | /** |
| 9 | * <p>This example demonstrates how to use buttons |
| 10 | * within the GUI framework JControl/Vole.</p> |
| 11 | * |
| 12 | * <p>(C) DOMOLOGIC Home Automation GmbH 2003-2005</p> |
| 13 | */ |
| 14 | public class VoleButtonExample extends Frame { |
| 15 | |
| 16 | /** |
| 17 | * Create different kinds of buttons. |
| 18 | */ |
| 19 | public VoleButtonExample() { |
| 20 | // create a simple button and add it to the frame |
| 21 | Button simpleButton = new Button("Press me!", 30, 45, 65, 12); |
| 22 | this.add(simpleButton); |
| 23 | |
| 24 | // create a Container with three RadioButtons |
| 25 | // and a Border around it |
| 26 | Container c1 = new Container(); |
| 27 | |
| 28 | RadioButton rb1 = new RadioButton("Radio 1", 5, 8); |
| 29 | RadioButton rb2 = new RadioButton("Radio 2", 5, 18); |
| 30 | RadioButton rb3 = new RadioButton("Radio 3", 5, 28); |
| 31 | |
| 32 | // add the RadioButtons to the Container |
| 33 | c1.add(rb1); |
| 34 | c1.add(rb2); |
| 35 | c1.add(rb3); |
| 36 | |
| 37 | // add a Border |
| 38 | c1.add(new Border("RadioButtons", 0, 0, 60, 40)); |
| 39 | |
| 40 | // add the Container to the Frame |
| 41 | this.add(c1); |
| 42 | |
| 43 | |
| 44 | // create a Container with two CheckBoxes and a Border around it |
| 45 | Container c2 = new Container(); |
| 46 | |
| 47 | CheckBox cb1 = new CheckBox("Check 1", 69, 10); |
| 48 | CheckBox cb2 = new CheckBox("Check 2", 69, 23); |
| 49 | |
| 50 | // add the CheckBoxes to the Container |
| 51 | c2.add(cb1); |
| 52 | c2.add(cb2); |
| 53 | |
| 54 | // add a Border |
| 55 | c2.add(new Border("CheckBoxes", 64, 0, 60, 40)); |
| 56 | |
| 57 | // add the second Container to the Frame |
| 58 | this.add(c2); |
| 59 | } |
| 60 | |
| 61 | /** |
| 62 | * Instantiate the VoleButtonExample. |
| 63 | */ |
| 64 | public static void main(String[] args) { |
| 65 | VoleButtonExample vbe = new VoleButtonExample(); |
| 66 | // make the Frame visible |
| 67 | vbe.show(); |
| 68 | } |
| 69 | } |


 Buttons